Why wasn’t it me who came up with melted chocolate on buttered, toasted bread? I crane my neck and scream at the chocolate gods:
Why? Why wasn’t it me?
As usual, they ignored me, but I’ll be alright. My girl, Alice Medrich, hooked me up.
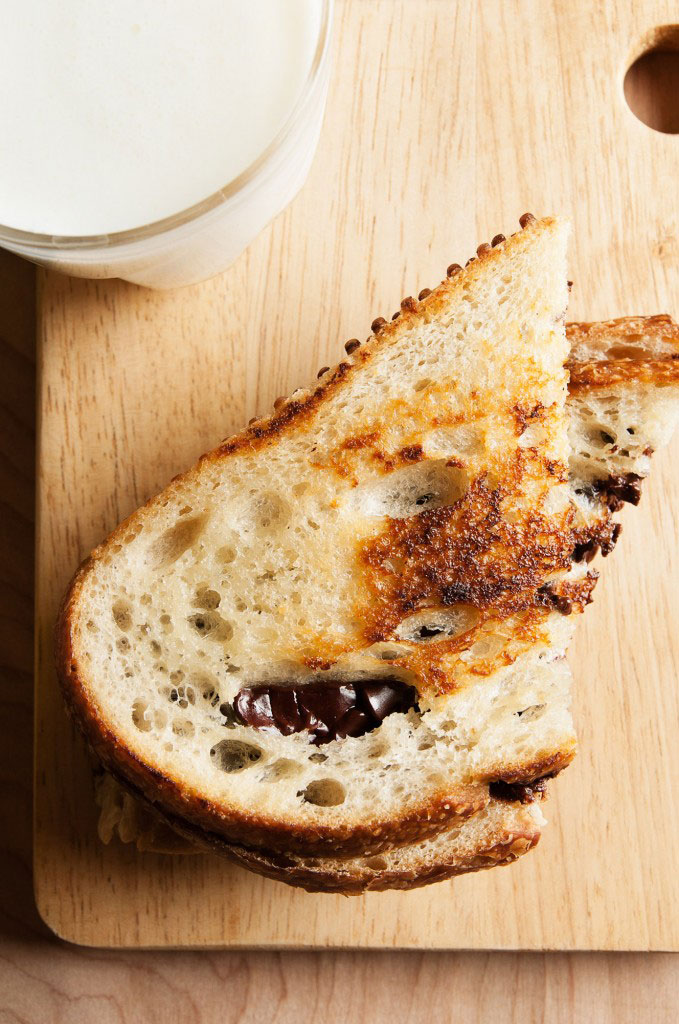
Usually, when it’s snack time, I reach for a big ole box of Cheez-its. Sometimes, if Sriracha is on hand, which is always, I’ll make my favorite stove top popcorn. But this sandwich? Oh man, grilled chocolate sandwiches are my new favorite snack. I love that you can see the chocolate peeking through the sourdough. Hello!
I’m not gonna lie to you. I put extra chocolate in my sandwich. Hey, it’s not my fault, man! San Luis Sourdough has really long slices, alright? Plus, I needed the antioxidants or whatever.
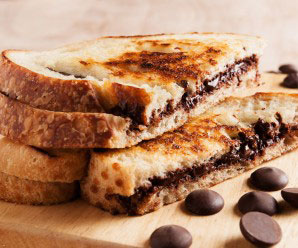
Pay attention, now because this is simple: chocolate + buttered bread + grill = your next culinary adventure. Do it…then tip your hat to Alice Medrich…and of course, the gods of chocolate.
Grilled Chocolate Sandwiches Recipe
Grilled Chocolate Sandwiches Recipe barely adapted from Food52
Why didn’t I know about this earlier? I should be ashamed of myself, as chocolate and I have been BFFs for ages. Not to worry, there are plenty of great chocolate recipes out there for me and you. So, get ready to gorge yourselves.
I’ve been revisiting this recipe for months. Don’t you just love Twix bars? There’s even a pumpkin version. What? (Back to the Cutting Board)
If chocolate and mint is your thing, you can get crazy with these cookies. (Martha Stewart)
All in all, I’ll probably end my day with this Gooey Chocolate Cake…topped with a humongous scoop of coffee ice cream…’cause that’s how I’d like to roll. (Joy the Baker)
Enjoy!
If there’s no chocolate in Heaven, I’m not going. Jane Seabrook
Listen up, everybody! The rumors are true. I’m throwing a surprise party and everyone’s invited. For whom, you ask? This grande soiree is for Margaret Fox.
I mean…I don’t know her personally, but what the hell? If she’s responsible for one of the easiest recipes I’ve ever made, then she deserves a vat of bourbon and a chocolate cake. One that she doesn’t have to bake herself, of course.
I spotted the recipe for Margaret Fox’s Easy Vegan Chocolate Cake on Food52. Immediately, I knew that it was something I had to make and probably very soon. One of the great things about this recipe is its simplicity. If you’re a baker, you probably have everything you need on hand. There will be no trips to the market because your boyfriend finished the eggs this morn. And don’t worry if your milk has gone south; you won’t need it, this go ’round. You’re good. Sit back and relax. You’ve got this.
You can file this recipe under quick. Well, not as quick as Usain Bolt, but quick nonetheless. Quick as in: your batter has come together, you’ve placed it in the pan and it’s all set to go, but your oven hasn’t preheated yet. What? Yeah, this recipe is no joke. Just think of all the things you can do with that extra time. You could wash all the dirty dishes before you even open your oven door. Now, I’m not telling you to do that, I’m just saying it’s a possibility.
Full disclosure: if you’re looking for a super-chocolatey cake, I’d give this one a pass. However, it’s super moist, pairs well with a straightforward icing and will be ready in 45 minutes-start to finish. I went with a light sprinkling of powdered sugar which made the preparation even quicker. As a result, I had just enough time to wrap Margaret Fox’s gift. I hope she likes Chia Pets.
5 tablespoons neutral oil (like corn, canola, or vegetable)
1 cup cold water
1½ teaspoon vanilla
1 tablespoon cider or white vinegar
Confectioners' sugar (optional, for dusting)
Instructions
Heat the oven to 350° F.
Mix together the flour, cocoa, baking soda, sugar, and salt. Sift. In a separate bowl, whisk together the water, oil, vanilla, and vinegar.
Whisk together the wet and dry mixtures. If lumpy, whisk until smooth.
Pour into a greased and floured 9-inch round cake pan. (I used an 8-inch which I lined with a greased aluminum foil round)
Tap the edge of the pan against the edge of the counter, or drop from 6 inches to the counter several times to pop air bubbles.
Bake for 25 to 30 minutes, or until the top springs back when pressed gently. (My 8-inch cake needed the full 30 minutes)
Cool before removing from the pan and dusting with confectioners' sugar, or frosting if desired.
3.2.1255
Easy Vegan Chocolate Cake Photo Notes
After being away from the studio for a few weeks due to illness, it was good to be back in the saddle. Unfortunately, I share a studio with a couple of fashion photographers and I’m the Felix Unger of our crew. Needless to say, the studio was in rough shape. Models are some of the messiest people on earth, so this ended up being more of a studio decontamination than photo shoot.
Gameplan
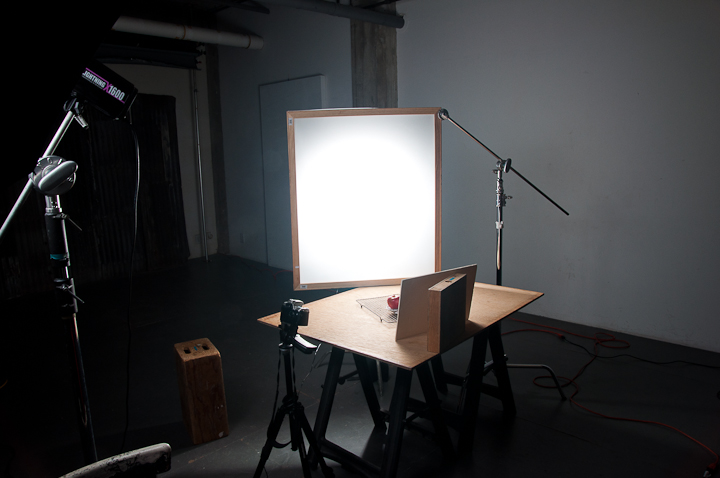
This was going to be pretty simple. I wanted to replicate window light with a bit of on-axis fill. The large simulated window would hopefully reduce the specularity created by the shiny surface of the easy vegan chocolate cake.
Lighting
I setup a light panel made up of 400 leelux as my main light 45 degrees behind the cake and used a silver umbrella for on-axis fill. I also added a white bounce card opposite the main light. I dialed in the exposure with my trusty Sekonic L-758dr and everything went according to plan.
Wrap-up
The real challenge wasn’t the lighting but the styling. A round dark cake without frosting isn’t the most photogenic object, so I decided to do something graphic and focus on the shape from above. To finish off the shoot, Mondo cut the cake and we did the traditional commercial shot with a slice on a plate. Overall, it was a pretty easy shoot with a clean studio as the payoff.
I’m not gonna lie. They’re cute as hell, but they’re totally not my thing.
You see, I’m a drop cookie fan. They’re easy, unfussy and if we’re talking about baking, those are two words I can get behind. Anyone who knows me knows I don’t like to decorate. I try and keep it simple, but I thought maybe, just maybe…I’d get a bit crazy with this one. And when I write ‘crazy’ I mean sprinkles galore! My goal was to make sugar cookies: simple, sweet and delectable. I kicked it up a bit with the sprinkles. As you can see from the first pic those things got away from me.
I read somewhere that bakers use honey or corn syrup to get the sprinkles to adhere to the cookie. I chose honey. That’s where it all went wrong. Honey is fantastic in my tea but most certainly not for decorating purposes. It was a nightmare. One I would never subject myself to again. In the future, I will use a simple icing made of powdered sugar and water. I’ve worked with that before and it’s a bit more manageable.
The upside of my minor dilemma is this is the best sugar cookie I’ve ever tasted. It comes together easily and keeps its shape, if rolled and chilled. It has the perfect amount of sweetness and is lovely with a cup of tea. Honestly, I prefer them unadorned…naked, if you will. It’s fun to dress things up but sometimes plain is just as adorable.
I now have a lot more respect for Jackson Pollock. This was supposed to be a quick shoot, but minutes turned into hours when we introduced chaos into the mix.
Gameplan
Mondo and I had high hopes for this shoot. With the bright colors and cool design, we thought these sugar cookies would look amazing on a pink or yellow surface.
Reality
Unfortunately, these looked awful on pink and yellow. In fact, the variety of colors clashed with everything. With my technicolor dreams quickly fading, I decided to move on to a neutral white acrylic.
Everything went well with the first setup, but the second shot with the sprinkles was a mess. As Mondo was setting up, I told her to leave the half empty cup on the table and took a quick test shot. The shot looked great, but I wanted a better composition and asked her to rearrange the sprinkles. This is when things took a turn for the worse.
No matter what Mondo did, the rearrangement never looked as good as the test shot. This normally wouldn’t be a problem, but trying to get a bunch of chaotic sprinkles into an organized design is friendship ending nightmare. After an hour or so of Mondo giving me the stinkeye, we finally got the shot with our friendship intact.
Lighting
This one was pretty simple. For the main light, I used a large light panel placed 45 degrees behind the sugar cookies to create texture and shape. The shadows were filled in with a white bounce card. To create a bit more specularity, I also added light from a silver umbrella for on-axis fill. Here is a lighting diagram with all the details:
1 c superfine sugar, 200g (place regular sugar in food processor for about 1 min)
1 large egg, lightly beaten
1 t vanilla extract or 1 vanilla bean
Instructions
Cream together the butter, sugar and any flavorings you’re using. Beat until creamy. Don’t over mix.
Beat in the egg until well combined, make sure to scrape down the sides of the bowl.
Add flour and mix on low until a non sticky dough forms.
Knead into a ball and divide into 2 or 3 pieces.
Roll out each portion between parchment paper to a thickness of ⅓ inch. (I used seran wrap)
Refrigerate dough for 1 hr or place in the freezer for about 30 minutes.
Once chilled, peel off parchment and cut out shapes with preferred cookie cutters.
Preheat oven to 350°F
Arrange cookies on parchment lined baking sheets and freeze for 5 minutes. (It’s very important you chill them again otherwise they’ll spread while baking.)
Re-roll scraps and repeat process.
Bake until golden around the edges. Rotate sheets halfway through for even baking.


 Listen up, everybody! The rumors are true. I’m throwing a surprise party and everyone’s invited. For whom, you ask? This grande soiree is for Margaret Fox.