What’s up, people? Are you ready for another round of the fabulousness that is Bundtbakers? I mean, I can’t hear you through my laptop so I’m assuming you all responded with a resounding “Yes!” This month’s theme is Strange but good flavor combinations. I found some weird ones out there, particularly this avocado pound cake…
I am feelin’ this mocha biscuit cake, y’all. And I gotta tell ya: I have a soft spot for desserts that come together easily…and this dessert falls into that category.
You and your chocoholic loved one will devour this Dark Chocolate Heart Cake on Valentine’s Day. I can’t believe Valentine’s Day is almost here. It feels like I was just baking a Nutella Glazed S’more Bundt Cake and complaining about how it felt like Fall would never come. Ironically, here it is the middle of…
Sometimes you need that extra somethin’ in your baking. Usually, I reach for Bourbon (god bless you, Kentucky), but lately I’ve been reaching for Amaretto. You may remember this lovely almond-infused liqueur from this california almond fudge pie or this incredible amaretto almond bunt cake.
After a much needed break, I’ve returned with a Southern favorite: Coca Cola Bundt Cake. Okay, I know what your thinking… Coca Cola Bundt Cake is not really a thing, but I’m making it a thing for this month’s #Bundtbakers. The theme, as you may have guessed, is retro desserts. When pondering old-school desserts the…
Do you make beautiful food, but take ugly photos? Gorgeous food photography doesn’t require a pro studio with expensive equipment, but it does demand good technique. With a little know-how, you can dramatically improve the quality of your images.
1. Use a Tripod
The tripod isn’t your enemy. I know you love to walk around the table and take pictures of food from a million angles, but you need to use a tripod. When shooting food, you’re not taking pictures, you’re making pictures. With a tripod, you can move the lights and experiment with the composition while keeping the same frame. Move the food, not the camera.
From a technical standpoint, using a tripod gives you some big advantages
Your food photos are going to be tack sharp
You can use a low ISO for maximum tonal quality
You can lower the shutter speed, stop down the aperture, and create a deep depth of field
Don’t be that guy who has an awesome food blog, gets a book deal, and then gives his publisher a bunch of lousy handheld photos.
2. Put Everything on Manual
When you use AUTO, you’re letting Nikon and Canon make the decisions for you. Sure, Canikon might get lucky and give you a few decent exposures, but at the end of the day, don’t you want to be the one in control of your art? This is what MANUAL can do for you.
ISO – Seriously, put this as low as possible. If you’re on a tripod, you can do this. A higher ISO increases noise and lowers dynamic range. If you want your images to look like last year’s Christmas cards from the 99 cent store, push up the ISO. It may look good on the back of your screen, but it will look like junk if you print it.
Focus – Selective focus can be a really cool thing in food photography. Increase the size of your aperture to create a very shallow in-focus area and magic can happen.
Shutter – This isn’t a big deal in food photography. If you’re too cool for school and decide to skip the tripod, make sure you’re shutter speed is at least 1/125 to avoid camera shake.
Aperture – This is where you can get really creative. To throw the background out of focus, open up the aperture (f2.8 is wide open on many lenses) and decrease the depth of field (this is the area that is in focus). To increase the depth of field, stop down the aperture (f22 is closed all the way down on many lenses). Commercial food photographers typically favor deep focus, but this is an aesthetic choice.
3. Change Your Camera Position
If you want a super lame food photo, take a picture from the sitting position. I like to go low because I appreciate the dramatic impact of putting food in the hero position, but going overhead works too. Here are a couple of things to keep in mind:
When shooting low, think about composition and try to create a foreground and background around the subject. The elements around the subject (silverware, napkins, cups etc) tell the story and give the image depth.
When shooting from above, think about design and try to frame the subject with various elements.
4. Fix the White Balance
The biggest problem with food photos on the web is the color blue. Most food blogs are photographed with indirect window light and this light is blue. The AUTO WHITE BALANCE should neutralize this, but it usually doesn’t. To fix this:
Manually place the white balance on “shade”
Do a custom white balance off a piece of white paper
Do a custom white balance off an 18% grey card
If you want to go “super pro” and impress your friends, go get a Colorchecker Passport.
Blue isn’t all bad and can be used creatively, but you certainly don’t want it to be the dominate tone throughout your photography.
Just a bit more
Here is a little more on the subject if you don’t understand the concept of white balance.
The color temperature of light isn’t uniform. Take for expample:
Morning light is cool.
Afternoon light is warm.
Tungsten light is orange.
Florescent light is green
The human eye adjusts and adapts to these colors, but cameras aren’t as efficient. Digital cameras try their best to neutralize these color casts and create a true white with AUTO WHITE BALANCE, but most of the time, they miss the mark.
Once you accept the fact that the colors your camera produces are wrong, you can fix the problem by manually setting the Kelvin temperature or creatively dial in new colors based on your subject.
Food Photography wrap-up
I was going to call this “4 Easy Ways To Improve Your Food Photography,” but good technique isn’t always easy. One of the great things about shooting food is the amazing challenges it presents. Anyone can put the camera on AUTO and get lucky once in awhile, but if you dig in and learn the science behind the photography, you can shoot like a pro.
Photo Credit: Photographed as a team with chef and photographer Roger Lai
This photo shoot did not go well-not on the first day or the second. And when photo shoots don't go well the d-man has a meltdown. You know, the "I don't need this shit!" kind of meltdown. It's not fun to be around, but I stick it out. Why, do you ask? Three words...Post. Meltdown. Magic.
Let me explain.
When something goes wrong the d-man gets mad-angry, temporarily succumbs to defeat and you think he's given up. But if you give him a minute, he refocuses, kicks it into high gear and puts-it-on-ya...photography-style. See Exhibit A below.
...but enough about the d-man's temperament.
Let's talk cookies. Vegan. Quick. Yummy. These bad boys are crazy-easy and you'll be finished inside of thirty minutes. What? You read me. The main flavor of this cookie is espresso combined with a dash of vanilla and a hint of cinnamon. What's surprising is not one flavor dominates.
I loved this cookie with its crunchy edge, non-dairy buttery-ness and melt-in-your-mouth texture. Fresh, out of the oven these cookies were amazing. With its espresso base the cookie is perfect for dunking in hot black coffee.
Guess what Dave did the next morning?
Easy Vegan Cookies? Meet my Go-To List.
Easy Vegan Cookies Photo Notes
by DavidGame Plan
This was going to be easy. I've shot a million cookies so I had this shoot in the bag. Since I went high key on the white acrylic for the Chocolate Covered Potato Chips, I would go low key and moody for the Easy Vegan Cookies. Simple.
The Reality
I've never seen moody cookies and now I know why. Cookies are happy and fun and going dark defeats the inherent nature of the subject. I put the cookies on gray slate with a dark background and started shooting. From a technical standpoint, I had my lighting mojo going but brown cookies against a gray surface is like wearing brown shoes with a black suit. It just doesn't work. Here's the shot:
Since the shot wasn't working, Mondo and I called it a day and went to the opening of an art show. Considering I was shooting the same thing the next day, I left everything setup in the studio. I never do this and always break everything down, but what could go wrong?
The Next Day
On the way down to the studio, I started thinking about Victor Schrager and theMartha Stewart Cookie book. I loved this book and always wanted to shoot a job like this. I had my inspiration.
I reset the studio, metered the lights down to perfection and was ready to rock. One problem:
------>I forgot to turn off my camera the night before and the battery was dead!
I didn't have a backup and I didn't have the charger with me. Damn! Mondo says I had a meltdown, but I was just a guy working through some things. I got in my car, drove through 45 minutes of LA traffic, recharged the battery for a couple of hours and drove back to the studio.
The New Setup
This was going to be super clean and super Martha Stewart. Mondo did her styling magic and staged the cookies. Here is the lighting setup:
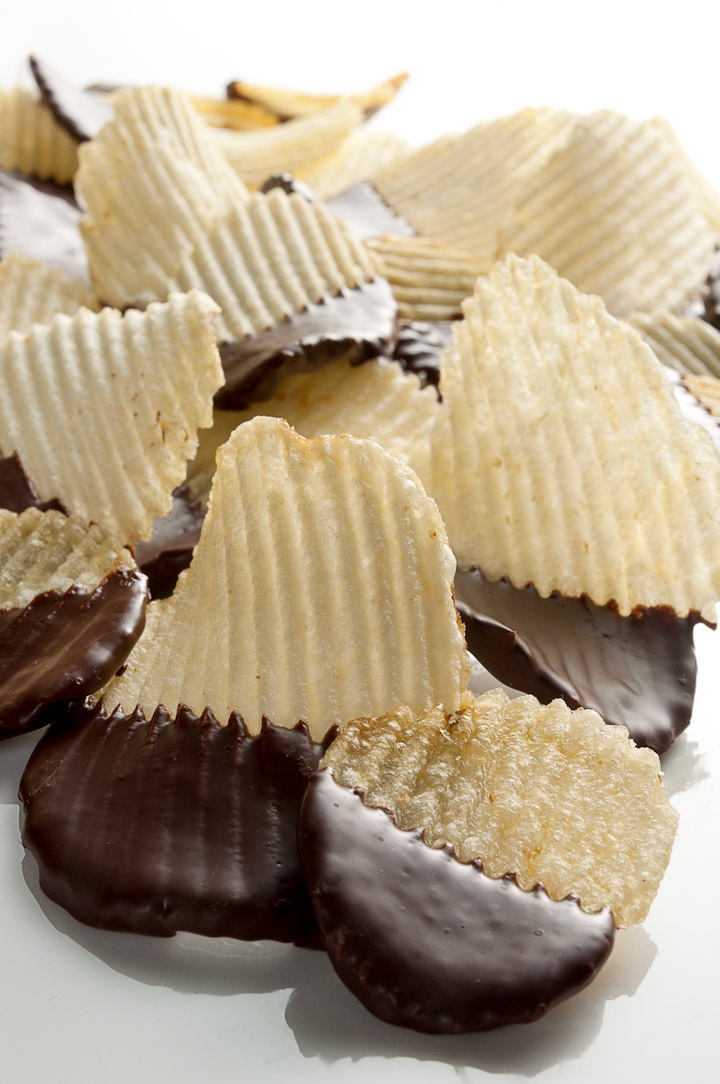
This lighting setup is so simple, it's stupid. The main light is a V-Flat (two 5x8 foamcore panels taped together) closed to a narrow strip with some bounce light going into it. The white background is just a light bounced into the back of the studio and the fill light is from a piece of white cardboard. For the stack shot, I used a piece of silver foil instead of the white board so I would have more texture and specularity on the side cookie.
The Takeaway
When things go wrong, I should chill because most of time everything works out. After all, life's pretty good when you get to eat a big plate of cookies at the end of the day.
½ cup vegan chocolate chips(I used Guittard Semisweet)
1 cup raw sugar
½ cup vegetable oil
1 tsp real vanilla extract
¼ cup water
Instructions
Preheat the oven to 350 degrees.
In a large bowl mix flour, baking powder, salt, cinnamon, and ground coffee. Reserve a teaspoon of the dry ingredients and set aside. Coat the chips with the teaspoon of the dry ingredients.
In a mixer add sugar and oil and mix for 3 minutes. Add the vanilla and then add the water. Again, mix well. Add the dry ingredients. Fully combine but don't overwork the dough.
Stir the chocolate chips into the dough.
Use a tablespoon to scoop onto ungreased cookie sheets (I used a size 40 scoop). Put them in the oven. Bake for 6 minutes and then rotate the sheet 180 degrees. Bake another 4 minutes. Remove from the oven. They will continue to cook a bit after being removed so they won't appear fully cooked yet.
quite frequently I say “We have to go back, I left the _____.”
my car looks like he hasn’t been washed since the ’90s
…and I don’t even know where my phone is, right now!
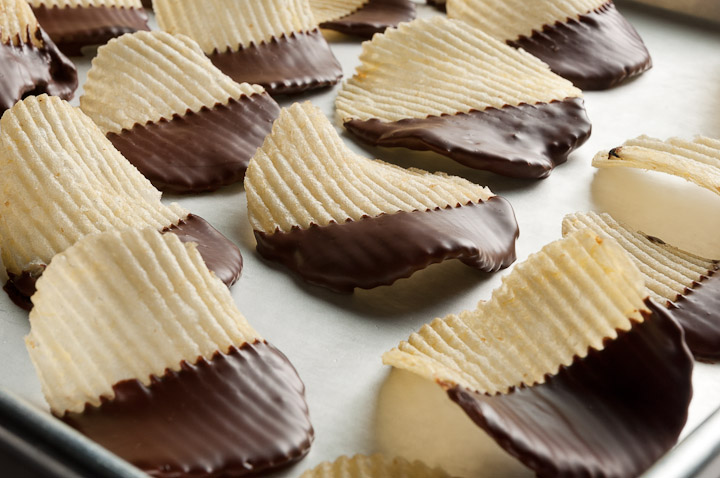
I could go on but I’ll spare you. The d-man says it’s part of my charm but most of the time, it’s just annoying. Needless to say, my hot-messiness and I are at odds. It’s a constant battle, but I claimed victory the day I made these chocolate covered potato chips. These chips say “I’ve got this!” And they were right.
Chocolate and potato chips was all I needed. Two ingredients and I had temporarily slayed the Hot Mess Beast. Head held high, I took these little beauties to a dinner party and watched my friends’ eyes alight with anticipation. They were incredibly impressed but had no idea that for some reason, my credit cards were in the trunk of my car.
I have to give it up for the d-man. I mean…the chips looked good when the chocolate cooled, but they looked nothing like this. This photography is some next-level *ish*.
Mondo called it, and I shot it. I did a few test shots in the baking pan, set up the white acrylic, and got conceptual with it.
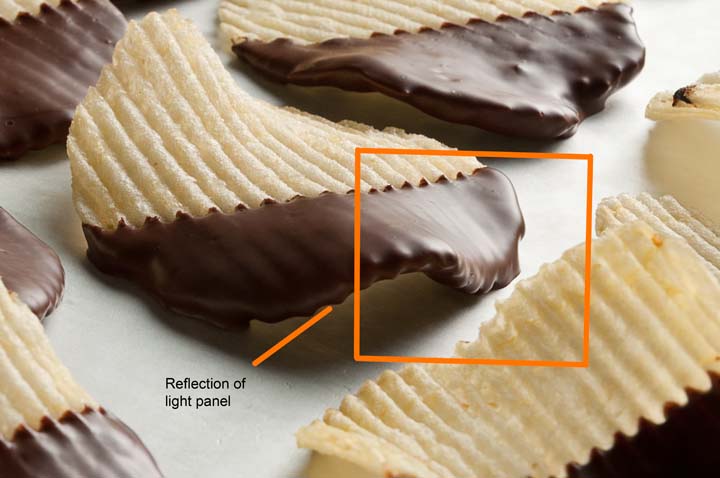
From a lighting standpoint, these things were a challenge. On a single chip, I had to light a textured and reflective surface. I wasn’t worried about the texture, but the reflective surface of the chocolate could be a problem. It would look completely flat unless I gave it shape with a bright highlight and a deep shadow.
To create this highlight and shadow, I pulled out my secret weapon: the Hacob light panel. This DIY light panel looks like junk, but it produces beautiful light with very soft transfer edges. Made by my former instructor Hacob, it’s a simple wooden picture frame filled with 400 Leelux.
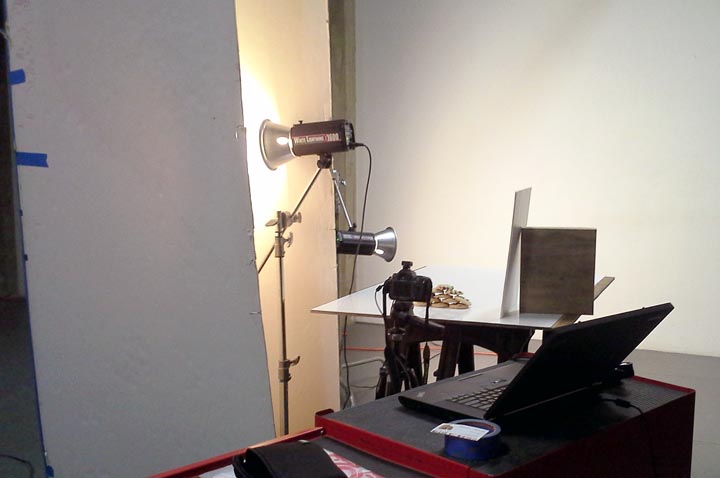
Set shot:
Ideally, this should have been shot on an infinity light table, but I did it with a piece of white acrylic propped up by a C-Stand. I placed a piece of white construction paper under the acrylic.
The lights:
1) The light in the back is adjusted one stop over my shooting aperature to create a pure white background. The modifier is a 60″ Photek Softlighter. It’s difficult to tell by the set shot, but the Softlighter is pointed upward to avoid refraction on the front lens element.
2) On the left, I have a simple white board to fill in the shadow area.
3) Lastly, on the right, I’m using the Hacob light panel to create a specular light on the side of the potato chips.
The funny thing is that after setting up the light panel to create beautiful highlights and shadows on the chocolate, I realized the back light was already doing the job. I changed gears and ended up using the light panel as an edge light.
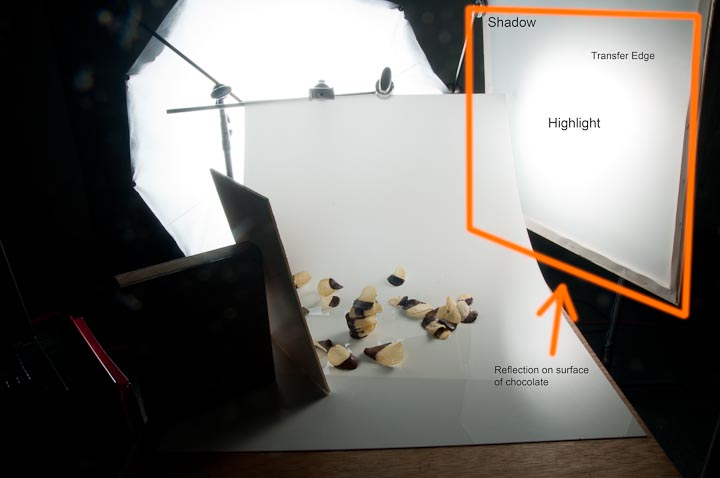
Finally, to provide a better idea of how reflective surfaces work (like chocolate), here is a technical breakdown from the first shot of this post (back light turned off):
Tech Notes:
Lighting: White Lightning X1600 monolight bounced through Leelux400 and Photek Softlighter 60″ for back-light
Camera: Nikon D90
Lens: Tamron 17-50mm 2.8
Tripod: Manfrotto with trigger grip
Aperture: f/14 – f/18
Shutter: 1/160
Focal Length: 50mm
Tarts are cool. Much cooler than cake or pie, for that matter. Tarts are just so laid back-like they have no worries. Unlike me; I worry about everything.
Ages ago I bought a tart pan…and when I write ages I mean sometime in 2011. Whilst pondering the very cool and laid back things I wanted to bake in said pan, I came across this recipe from Heidi at 101 Cookbooks. It is simple and unfussy, which is definition of laid back. Is it not?
This recipe is great if you want to make something quick and impressive for dessert or a lazy Sunday morning. I used whatever apples I had on hand which is invariably, Fuji. Fuji is my favorite apple, unless Honey Crisp is in season. Then I’m like…Fuji who?
This batter makes quite a bit of dough, too much for my 9 x 1.5 pan. I suggest halving the recipe or baking it in two pans. Otherwise, your finished product will be quite dense and won’t cook all the way through.
My favorite part of the cake was the crust-all shiny and golden. Would you consider me weird for slicing the crust off the top and leaving the rest behind? Yes? Then I guess I’m weird…and I’m ok with that.
P.S. Apple Cake accessories may include: floral jammies, french press and a king-sized comforter.
Check out the d-man’s lighting technique below.
Apple Cake Photo Notes
This shoot was a bit of a bust. It started off fine, but plumbers + food photography = disaster. Let me explain.
I work out of a really cool photo studio in a beautiful apartment complex built in the 1920’s. I love the space, but last year, the adjoining art studio was taken over by a plumbing company. Unfortunately, we share a common bathroom and I’ve learned photographers and plumbers don’t mix. I have a “live and let live” attitude, but these guys can be a headache.
The latest drama came in the middle of the apple cake shoot. A plumber knocked on my door and said “We need to run a cable through your studio for the new security cameras we’re putting up in the hallway.” This wasn’t good. I told them to call the landlord and went about my business. After a few minutes, the owner came over and told me he really needed to run a cable through my studio and I told him he really needed to call the landlord. That never happened and they bypassed my studio and did the job anyway. I don’t know why a plumbing company needs “Mission Impossible” style security in a common hallway, but I now have the most secure shared bathroom America. I also have a blown apple cake photo shoot, but those are the breaks.
Here is a lighting diagram for the abbreviated shoot. The setup is the same as the cinnamon rolls recipe.
Dave
Tech Notes:
Lighting: White Lightning X1600 monolight bounced through Calumet light panel
Camera: Nikon D90
Lens: Tamron 17-50mm 2.8
Tripod: Manfrotto with trigger grip
Aperture: f/11
Shutter: 1/160
Focal Length: 50mm
I keep my instant yeast in the freezer. Probably because I’m afraid of it. Well, that’s a bit much. Let’s say I’m apprehensive when it comes to yeast. It’s true. I’m seeing a therapist about it.
Last night I realized it was time to bite the bullet, conquer my fears, throw caution to the wind…well, I think you get the picture. It was time for cinnamon rolls! But cinnamon rolls need yeast.


 Let's talk cookies. Vegan. Quick. Yummy. These bad boys are crazy-easy and you'll be finished inside of thirty minutes. What? You read me. The main flavor of this cookie is espresso combined with a dash of vanilla and a hint of cinnamon. What's surprising is not one flavor dominates.
I loved this cookie with its crunchy edge, non-dairy buttery-ness and melt-in-your-mouth texture. Fresh, out of the oven these cookies were amazing. With its espresso base the cookie is perfect for dunking in hot black coffee.
Guess what Dave did the next morning?
Easy Vegan Cookies? Meet my Go-To List.
Let's talk cookies. Vegan. Quick. Yummy. These bad boys are crazy-easy and you'll be finished inside of thirty minutes. What? You read me. The main flavor of this cookie is espresso combined with a dash of vanilla and a hint of cinnamon. What's surprising is not one flavor dominates.
I loved this cookie with its crunchy edge, non-dairy buttery-ness and melt-in-your-mouth texture. Fresh, out of the oven these cookies were amazing. With its espresso base the cookie is perfect for dunking in hot black coffee.
Guess what Dave did the next morning?
Easy Vegan Cookies? Meet my Go-To List.