High Pass sharpening is the absolute best way to sharpen photos. If you plan to print or display your images on the web, sharpening is an essential process to make your pictures look their best.
What’s Sharpening
In the days of yore, a printer would sandwich a negative with a slightly blurred positive and make a quick exposure. He would then complete the exposure with the original negative. This would create a print with sharp edges.
As digital came of age and film scanning became the norm, the Unsharp Tool was created in Photoshop to replicate this process. It was a great tool for scanned film, but unfortunately, users continued to use it as the world moved to pure digital capture.
Today, the best tool for sharpening is the High Pass Filter.
How to use High Pass Sharpening in Photoshop
When I was in college, I was very fortunate to have a professor named Joan Wantanabe teach me this technique. Here is her method:
Step 1
Duplicate the layer that needs to be sharpened:
Ctrl J – Win
Cmd J – Mac
If there are multiple layers from retouching, merge copy onto a new layer:
Ctrl Alt Shift E – Win
Cmd Alt Shift E – Mac
Note: Sharpening should be the last step after all retouching has been completed
Step 2
Rename new layer to “High Pass Sharpening” and set layer blendmode to “Soft Light”
Note: the blendmode is in the top left corner of the layers palette.

Step 3
Desaturate image:
Crtl Shift U – Win
Cmd Shift U – Mac
Step 4
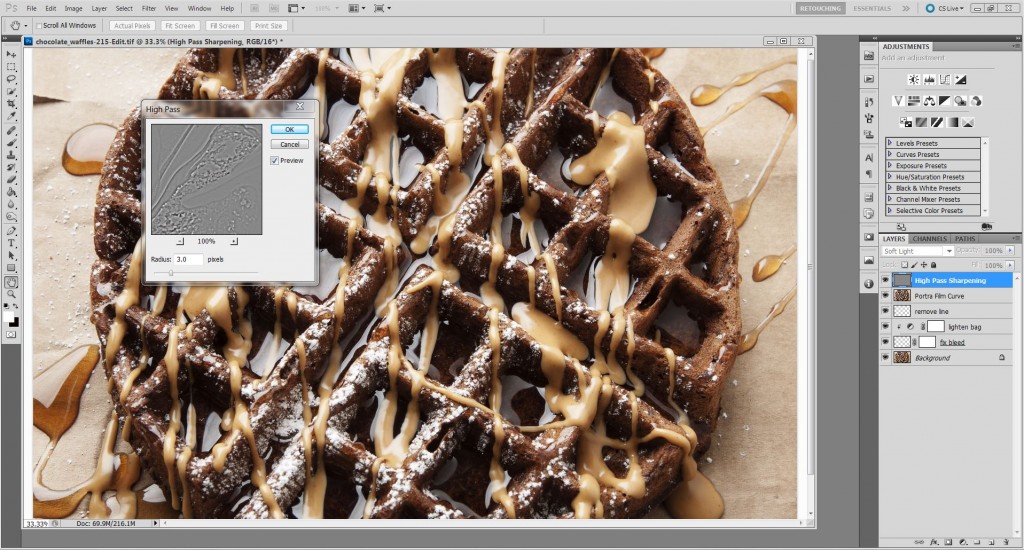
Zoom into at least 100% to see the most detail. Select the High Pass Filter:
Menu Filter Other High Pass
On the High Pass Filter, move the slider to the left to make everything gray. Then slowly move the slider to the right until the edges are defined.
Click OK

Step 5
Examine image for haloing, noise, and artifacts. If necessary, target specific areas for sharpening instead of the whole image:
Place a black mask over the layer and brush in sharpness with a low opacity brush.
Note: If overall sharpness needs to be increased, duplicate the layer. If overall sharpness needs to be decreased, lower the layer opacity.

Final Thoughts
The High Pass filter is a really cool tool because sharpness can be brushed into the image. Most of the time I set the filter between 1 and 3 and do little else. The important thing is to look for haloing on the edges and noise in the flat areas. If any dubious items appear, just add a mask and brush away the problems.


David thanks for the concise clear tip on the high pass filter. I’ve now revised and refined my sharpening and taken it to another level.
Cool! Since I wrote this tutorial, I’ve created an “action” for High Pass Sharpening. It’s simple and and now only takes one click to sharpen.
このブログは、その上に非常に役立つ情報をたくさん持っています!私に通知するための乾杯。
ただ したい欲望あなたの記事のようにあると言う驚異。 | 単にあなたのポストで鮮明透明性がある 壮大な優れたと私はでき |この主題の専門家あなたがしているあなたがあると仮定します。 まあ今後のポストに| 更新日まで保つために| | フィードRSSフィード私はあなたをつかむためにあなたの許可を持つましょう許可。おかげで百万と 楽しい仕事。あなたは私の心を読んで、そのような
Great article. Question, do you still need to “Sharpen for Print” during exporting in Lightroom? Or will that over sharpen the images for print? Thank you — I cannot find an answer to this anywhere.
If you’re editing out of Lightroom, forget the High Pass sharpening in Photoshop. The output sharpening in the export window of Lightroom is actually based off the high pass algorithm in Photoshop. Both are nearly identical. To answer your original question, if you prefer to use the High Pass sharpening in PS, then don’t use any output sharpening in the export window of Lightroom. It has the potential to over-sharpen the image.