Photographer David Mayerhofer creates dramatic images of still life, food, and urban landscapes for a variety of clients and has had his work featured in The Los Angeles Times. His commercial studio is located in Hollywood California and can accommodate everything from intimate portraits to large scale advertising assignments.
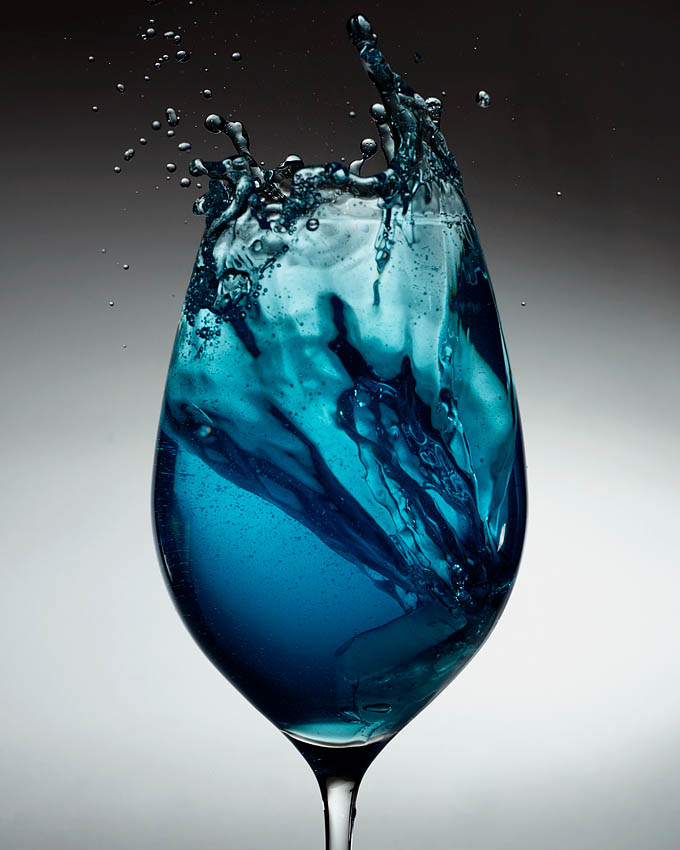
Splash photography is ridiculously cool. It looks amazing and never fails to impress an audience. I did the “blue wine” shot in photography school but have kept it in my portfolio because it always gets a reaction. It may look like a studio shot, but it was a rushed last minute assignment done with a single flash. Here is how I shot it: Read More…
I’m a relatively neat person, but my digital life was a mess. I’m the guy who filled up his desktop with random files and then swept them into a folder named “desktop.”
Unfortunately, the chickens came home to roost last week when an old client needed some prints from a shoot in 2011. Eventually I found the files, but it wasn’t easy. If only I had started my search in “desktop 8.” Read More…
If you’re a trustfund hipster who has an interest in photography, stop wasting your money on skinny pants and go to photography school. The best schools are Brooks and the Hallmark Institute. Once you graduate, you’ll have a whole new way to be pretentious.
If you’re like everyone else who loves photography but doesn’t have 60-100k to drop on school, check out your local community college. Community colleges may get a bad rap, but the professors and facilities are typically top notch.
With today’s shifting economy for visual media, taking a couple of years of community college to learn the fundamentals followed by a few assisting jobs is the smart move.
A lot of people will tell you to skip school and just “shoot,” but I don’t agree. Here are 7 reasons why it’s a good idea to go to photography school.
1. Critiques
Your mom and the lemmings on Flickr may love your photos, but are they really any good? When you have to place your work alongside others and receive an oral evaluation, you’ll quickly begin to understand the difference between average and great work.
2. Learn Teamwork
Photography can be a solitary activity, but in photography school, group projects are a big deal. Just like on a commercial set, the people supporting the photographer can make or break a shoot. Photographers who are jerks and don’t play nice with others fail.
3 Get exposed to different work
The photography world is vast and a great professor can open your eyes to a whole new way of seeing.
4. Learn to use film and print
Film may be dying, but it’s still an invaluable learning tool for understanding how tonal curves work. Nothing breaks the Photoshop crutch like having to optically print a black and white negative.
5. Push your work out of the box
Most people seem to shoot the same junk over and over again. Photography school forces you to do a variety of assignments outside your comfort zone. I may not shoot sports, but I can do it because of school.
6. Learn from certified professionals
Unlike the self-proclaimed experts on the internet, a college professor has a vast amount of knowledge and has been thoroughly vetted. Why waste money on a 2 day workshop when you can learn from a true professional over the course of a semester?
7. Photography school network
A network of friends and fellow photographers is invaluable. As you step out into the professional world, you’ll always be able to rely on your network for honest critique and a free helping hand when needed.
Go Take A Class -NOW!
If you’re one of those photographers who’s always on the net obsessing over gear instead of shooting, go take a class! Nothing will help you more than actually learning how to use your camera.
If you’re in the Los Angeles area, the Glendale Community College photography program still has a few spaces available in their summer session. The professors teaching the classes are the best of the best so if you love photography and have some free time this summer, sign up!
In this continuation of part 1, I expand on the photo gear needed to setup a food photography studio.
Tripod
This is the one area that people always cheap-out on so DON’T! A good tripod will outlast your digital camera and most likely you. My dad purchased a lightweight aluminum tripod in the 1960’s and guess what? He still pulls it out of the closet every Christmas.
Manfrotto tripods are the industry standard and I use the 055xprob because of its lightweight and durability. I paired it with the Manfrotto 322RC2 grip head, but it’s been problematic. Over the past year it’s lost all of its tension and I’m likely going to replace it with the 498RC2 ball head.
If I had to start a new system from scratch, I wouldn’t choose Nikon or Canon. A million other food bloggers swear by these full-frame systems, but compact mirrorless systems like the Panasonic GH4 are the future.
In 2014, with the convergence of image quality across all sensor sizes, photographers don’t need the weight or expense of a full-frame system. The image quality from these various sensors is nearly identical on a computer monitor where 99.9% of work is displayed, so why not choose the superior ergonomics of a compact system camera. If you need a full-frame DSLR for a job, just rent one.
For the typical food photography studio kit you’ll need 3 lenses: a fast standard zoom, a macro, and a standard prime. Focal lengths vary across sensor sizes, but in full-frame digital this equates to a 24-70mm f/2.8, a 90mm f/2.8 and 50mm f/1.4. For the advanced photographer, I would also recommend a lens or an adapter that facilitates tilt/shift movements.
The compact camera systems and the respective lenses I like for a food photography studio are as follows:
One other camera to consider is the Sony A7r. This is a full-frame mirrorless camera that has created a paradigm shift in the industry. It combines the benefits of mirrorless with the superior image quality of a large sensor. The only problem is that the system lacks lenses. When the system matures, the A7r should definitely be a consideration.
Lighting for a Food Photography Studio
This is the big one that a lot of people get hung-up on. If you’re just starting out, natural light is your best bet. These are a few of the natural light sources I like to use:
Window with indirect light
Open door with indirect light
Window with a sheet of white ripstop nylon to diffuse the light
Open door with a sheet of white ripstop nylon to diffuse the light
Outdoors under the shade of a tree (watch out for the green color cast)
Outdoors under the shade of a tree with a white or silver bounce card
Artificial Light
Some photographers fall in love with the look of natural light and base their careers around it, but I prefer strobes due to their flexibility and value. Before I outline the ideal strobe kit, here are a few products to avoid:
Lowel Ego Florescent Light – This has a nice quality of light, but it’s a little small to be a main all purpose light. In addition, it can’t be mounted on a light stand to facilitate maneuverability.
Flashes – Everyone got the strobist religion a few years back, but these are lousy for a food photography studio because they don’t have a modeling light. It’s best to have a least a 250w modeling light in the strobe so you can see how the light is hitting the food.
LED panels – These look good on paper, but LED panels don’t provide a full spectrum of light.
Umbrellas – These are cheap and can be used with flashes and strobes, but the light goes everywhere. To achieve control, a light modifier should have a solid straight edge.
My recommendations:
If you plan to go out and do a lot of video in addition to photography, forget the strobes and buy some Kino Flos along with a few Arri Fresnels. For strobes, I like the products from Paul C Buff because they’re cheap and durable. This is my kit:
I like this setup because it gives me a soft editorial look with the option to go harder with grid spots. The White Lightning strobes have a powerful modeling light and the controls are basic analog sliders.
For lighting equipment, I always prefer simple gear that will stand up to abuse.
Final Stuff
To complete a food photography studio, you’ll need a lot of little things like black cards and white cards for additive and subtractive light along with a few small mirrors. In addition, a light meter like the Sekonic L-758DR always helps as does an 18% grey card to correct the color.
All of this gear may seem extensive, but you don’t have to buy it all at once. You can take amazing food photos with just window light and a bounce card. As your skill grows overtime, you can start to experiment with a strobe or two and figure out what you really need. The wonderful thing about food photography is that it doesn’t depend on gear, just talent.
Setting up a food photography studio can be a serious challenge. With all the marketing directed at photographers, it’s very difficult to make an informed decision.
This guide is intended to alleviate some of the confusion and provide a clear path to setting up an inexpensive food photography studio. If you’re a food blogger or a photographer starting a food photography business, then this guide is for you.
The Table
You have to put the food on something and using a regular table can be awkward and inconvenient. Most food photography studios simply use a piece of plywood and a couple of saw horses. The best part of this combo is that everything can be folded flat and put in a closet. I like to use a sanded piece of plywood that’s approximately 4’x6′ and a couple of compact sawhorses from Home Depot. It’s a cheap and simple.
The Surfaces
Acquiring surfaces can be expensive, but with a little DIY it doesn’t have to be. I like to use stained wood and Formica, but every photographer has their own style. Here are some typical options:
wooden cutting boards
wooden serving trays
used baking pans
reclaimed wood from abandoned buildings
old painted metal signs
Formica
wooden fence planks
wooden floor boards from the hardware store
place mats
napkins
fabric sheets
marble countertops
brown paper bags
wax paper
tissue paper
This list could go on forever, but surfaces should either be neutral or work as a complimentary color with the food. It’s also important to remember that the viewer should focus on the food and not the surface. Busy surfaces may look good in person, but typically look out of place in photos.
These are the same as the surfaces but with a vertical orientation. Depending on how you shoot, backgrounds may not be necessary, but for hero shots, you need them.
I like to hang my backgrounds from light stands with grip arms and super clamps, but a variety of solutions exist. It’s just as easy to use foamcore or an empty picture frame with a fabric wrap. I’ve even seen photographers use gaffer tape to stick wallpaper on a white wall.
It isn’t a big deal how you hang it, just as long as the background is separated from the table and doesn’t create a color cast.
Dinnerware
It may seem counter-intuitive, but the plates and bowls on a tabletop set should be small. Large items overwhelm the food and make it exceptionally difficult to compose. Large plates also affect the field of view and can force the use of wide angle lenses.
It’s also important to select neutral plates with a low rim. I frequently like to shoot from a low angle and hate it when half the frame is dominated by a thick rim.
Once again, Sur La Table, Crate & Barrel, and Ikea are great places to pickup dinnerware, but my favorite places for this stuff are the local estate sales. Cheap is always good, but cheap and unique rules.


 Setting up a food photography studio can be a serious challenge. With all the marketing directed at photographers, it’s very difficult to make an informed decision.