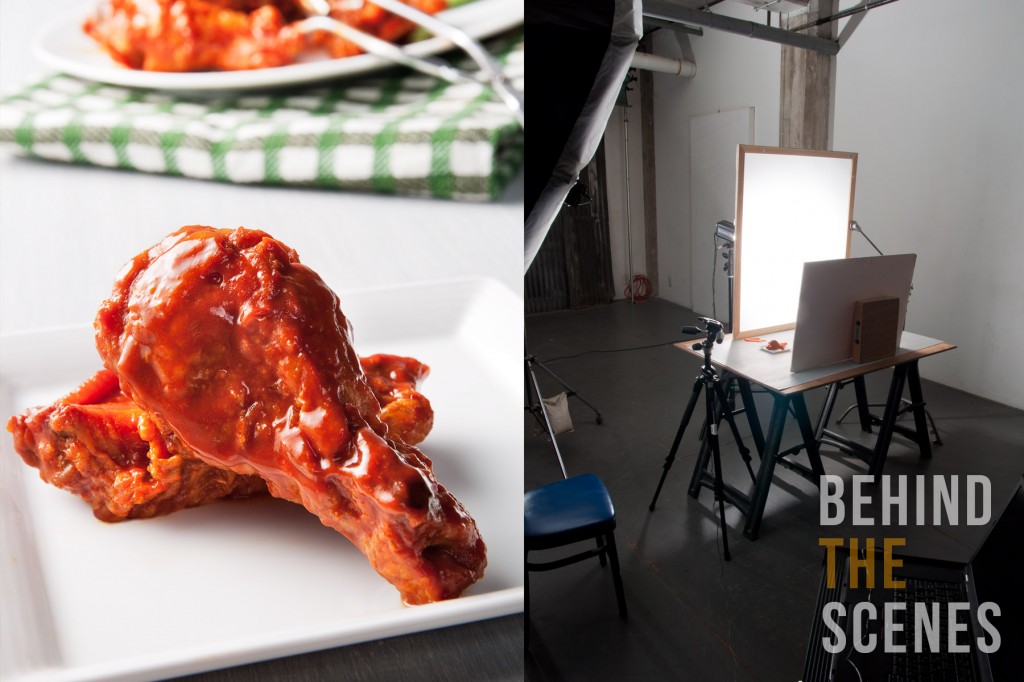
Reduced Fat Buffalo Wings: Behind the Scenes

buffalo wings bts

This shoot was lame.  I thought it was going to be a cakewalk, but it took me a couple of hours and a 100 frames to get some decent stuff.

As I’ve said before, knowing the nature of an object (textured, translucent, transparent etc) is everything when it comes to food and still life photography.  I went into this with a lighting plan for textured objects but ended up photographing a bunch of reduced fat buffalo wings with a highly reflective sauce.  Unfortunately, it took an hour and a lot of awful photos before I realized I had everything setup wrong.

When I was doing the research for this post, I noticed that practically every hot wing shot on the web was terrible.  I should have taken note that photographing buffalo wings might be a challenge, but I assumed I was better than every other photographer in the world and I would kill it.  It was a classic case of arrogance meets stupidity.

Here’s the thing that makes buffalo wings a headache to shoot:  With the sauce, they’re mirrored objects that reflect everything around them.  In other words, you don’t shoot the wings, you shoot the reflections.

In order to get some nice reflections, I moved a light panel right up against the buffalo wings and lit everything from the side. I then placed a large white board opposite the panel to add a few more reflections.  In the end, the buffalo wings looked 3D because they had bright specular highlights from the light panel and soft white shadows from the bounce card.

All in all, I was happy with the final result, and will be ready and humble the next time I have to shoot some wings.

buffalo wings setup

Technical

Camera: Nikon D90
Lens: Tamron 17-50mm 2.8
Strobes: White Lightning x1600
Tripod: Manfrotto
ISO: 200
Focal Length: 50mm
Shutter: 100
Aperture: f/11


French Toast Sausages: Behind the Scenes

French Toast Sausages Diptic

Since this is the day after the Rose Parade and Mondo and I are about to head out to see the floats, I’ll keep the french toast sausages shoot short and simple.

Setup

I wanted to do an easy menu shot for Foodgawker and Tastespotting along with a few shots for the post.  Unfortunately, I had a lot of trouble getting these to look right.  Maybe I was just tired from the holidays, but my lighting was a mess.

Getting it together

After futzing around for a few hours trying to make boring menu photographs I thought Foodgawker would like, I finally started to make photographs that I liked.

Since I was having trouble, I shut down everything except for one light and went back to the basics. This was a textured object, so I setup  a light panel on the left and scraped light across the surface of the object.  I then placed a white board on the opposite side of the light to reduce contrast.  That’s it.

With this simplified setup, I got a few shots I liked, and called it a day.

french toast sausages lighting setup

 Technical

Camera: Nikon D90
Lens: Tamron 17-50mm 2.8
Strobes: White Lightning x1600
Tripod: Manfrotto
ISO: 200
Focal Length: 50mm
Shutter: 125
Aperture: f/16


How to Crop a Photo for Tastespotting & Foodgawker

How to crop a photo for Tastespotting and Foodgawker: Lightroom Catalog

When I need to crop a photo for Tastespotting and Foodgawker, my tool of choice is Adobe Lightroom.  In addition to being an amazing image cataloging program, Lightroom has a super simple cropping tool that makes it easy to get your images ready for the web.  If you don’t already have it, check out the Adobe Photographer Program and give yourself an early Christmas present.

Why Bother?

The crop tools provided by Foodgawker and Tastespotting are nice, but Lightroom is better and you have complete control over your images.  In addition, you can add sharpening to compensate for the jpeg compression.  Finally, with Lightroom, you only have to crop once and the job is done for all the social media sites.

The Requirements

Foodgawker recently moved the cheese and updated their image requirements to accommodate the Apple retina displays.  Tastespotting is going to do the same, so you should check out the latest info.

Here are the pertinent pages:

Tastespotting image submission guidelines
Foodgawker FAQ page

As of December of 2013, the image guidelines to crop a picture for Tastespotting and Foodgawker are simple:

Tastespotting – 250 x 250 pixel image

Foodgawker – 550 x 550 pixel image

How To to Crop a Photo for Tastespotting and Foodgawker

Step 1

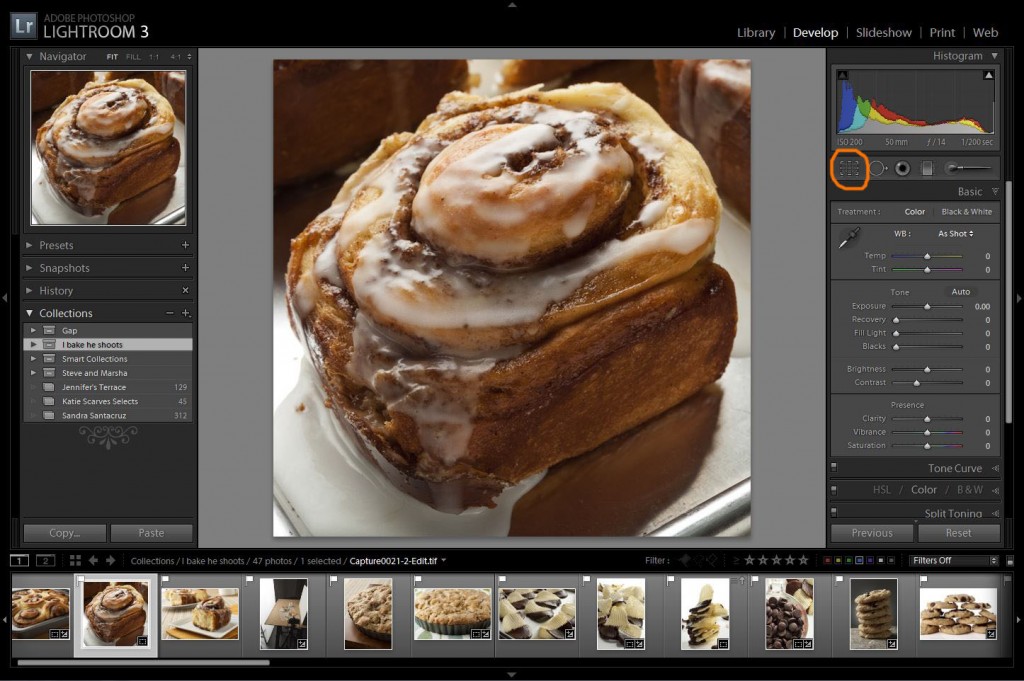
Select the desired image in the catalog and move into the Development module.  Find the image adjustment tools under the histogram and select the crop tool.

How to crop a photo for Tastespotting and Foodgawker: select image catalog.

Step 2

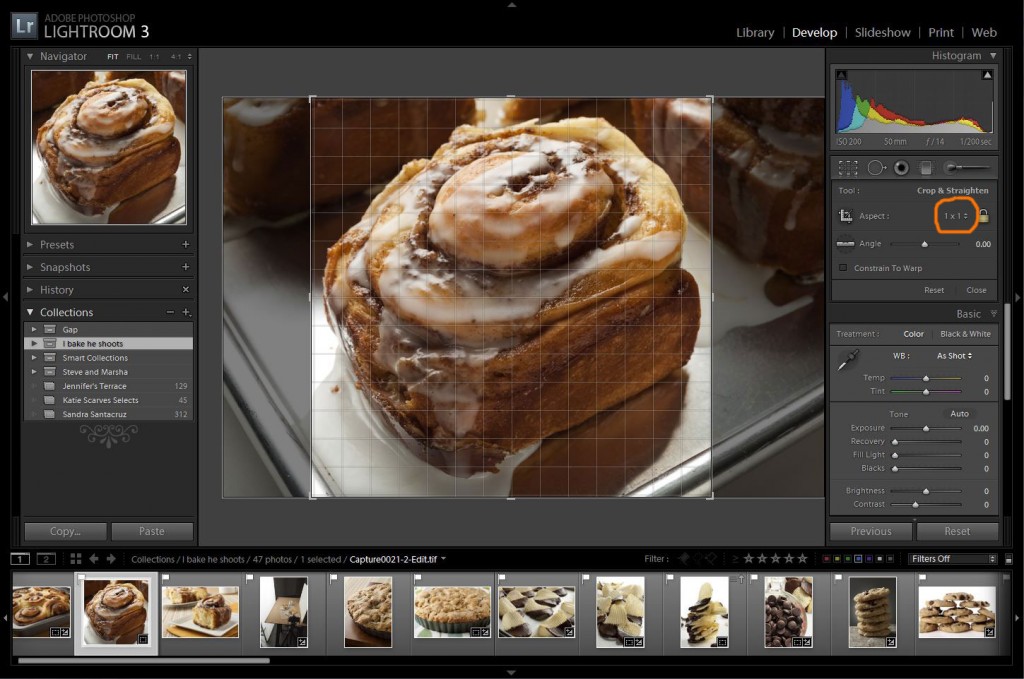
In the crop tool window, select an aspect of 1×1.  Manipulate the highlighted image until the desired crop is achieved.  Hit Enter.  If further manipulation is required, select the crop tool again and readjust the image.

How to crop a photo for Tastespotting and Foodgawker: crop tool selected.

Step 3

Move back into the library module and click on the Export button.  To create a Tastespotting/Foodgawker acceptable image, setup the Export setting as follows:

How to crop a photo for Tastespotting and Foodgawker: export settings lightroom

File Settings

Format: jpeg
Color Space: SRGB
Quality: 100

Image Sizing

Resize to fit: Check Mark with Long Edge or Short Edge
Size: 550 pixels for Foodgawker/250 pixels for Tastespotting
Resolution: Leave as is

Output Sharpening

Sharpen for: Screen
Amount: High

Click Export to create a jpg

Wrap Up

Cropping a photo for Tastespotting and Foodgawker is a bit of a chore, but it’s worth the effort.  With Lightroom, cropping is a snap and you have a wide range of tools to make your images look their best.