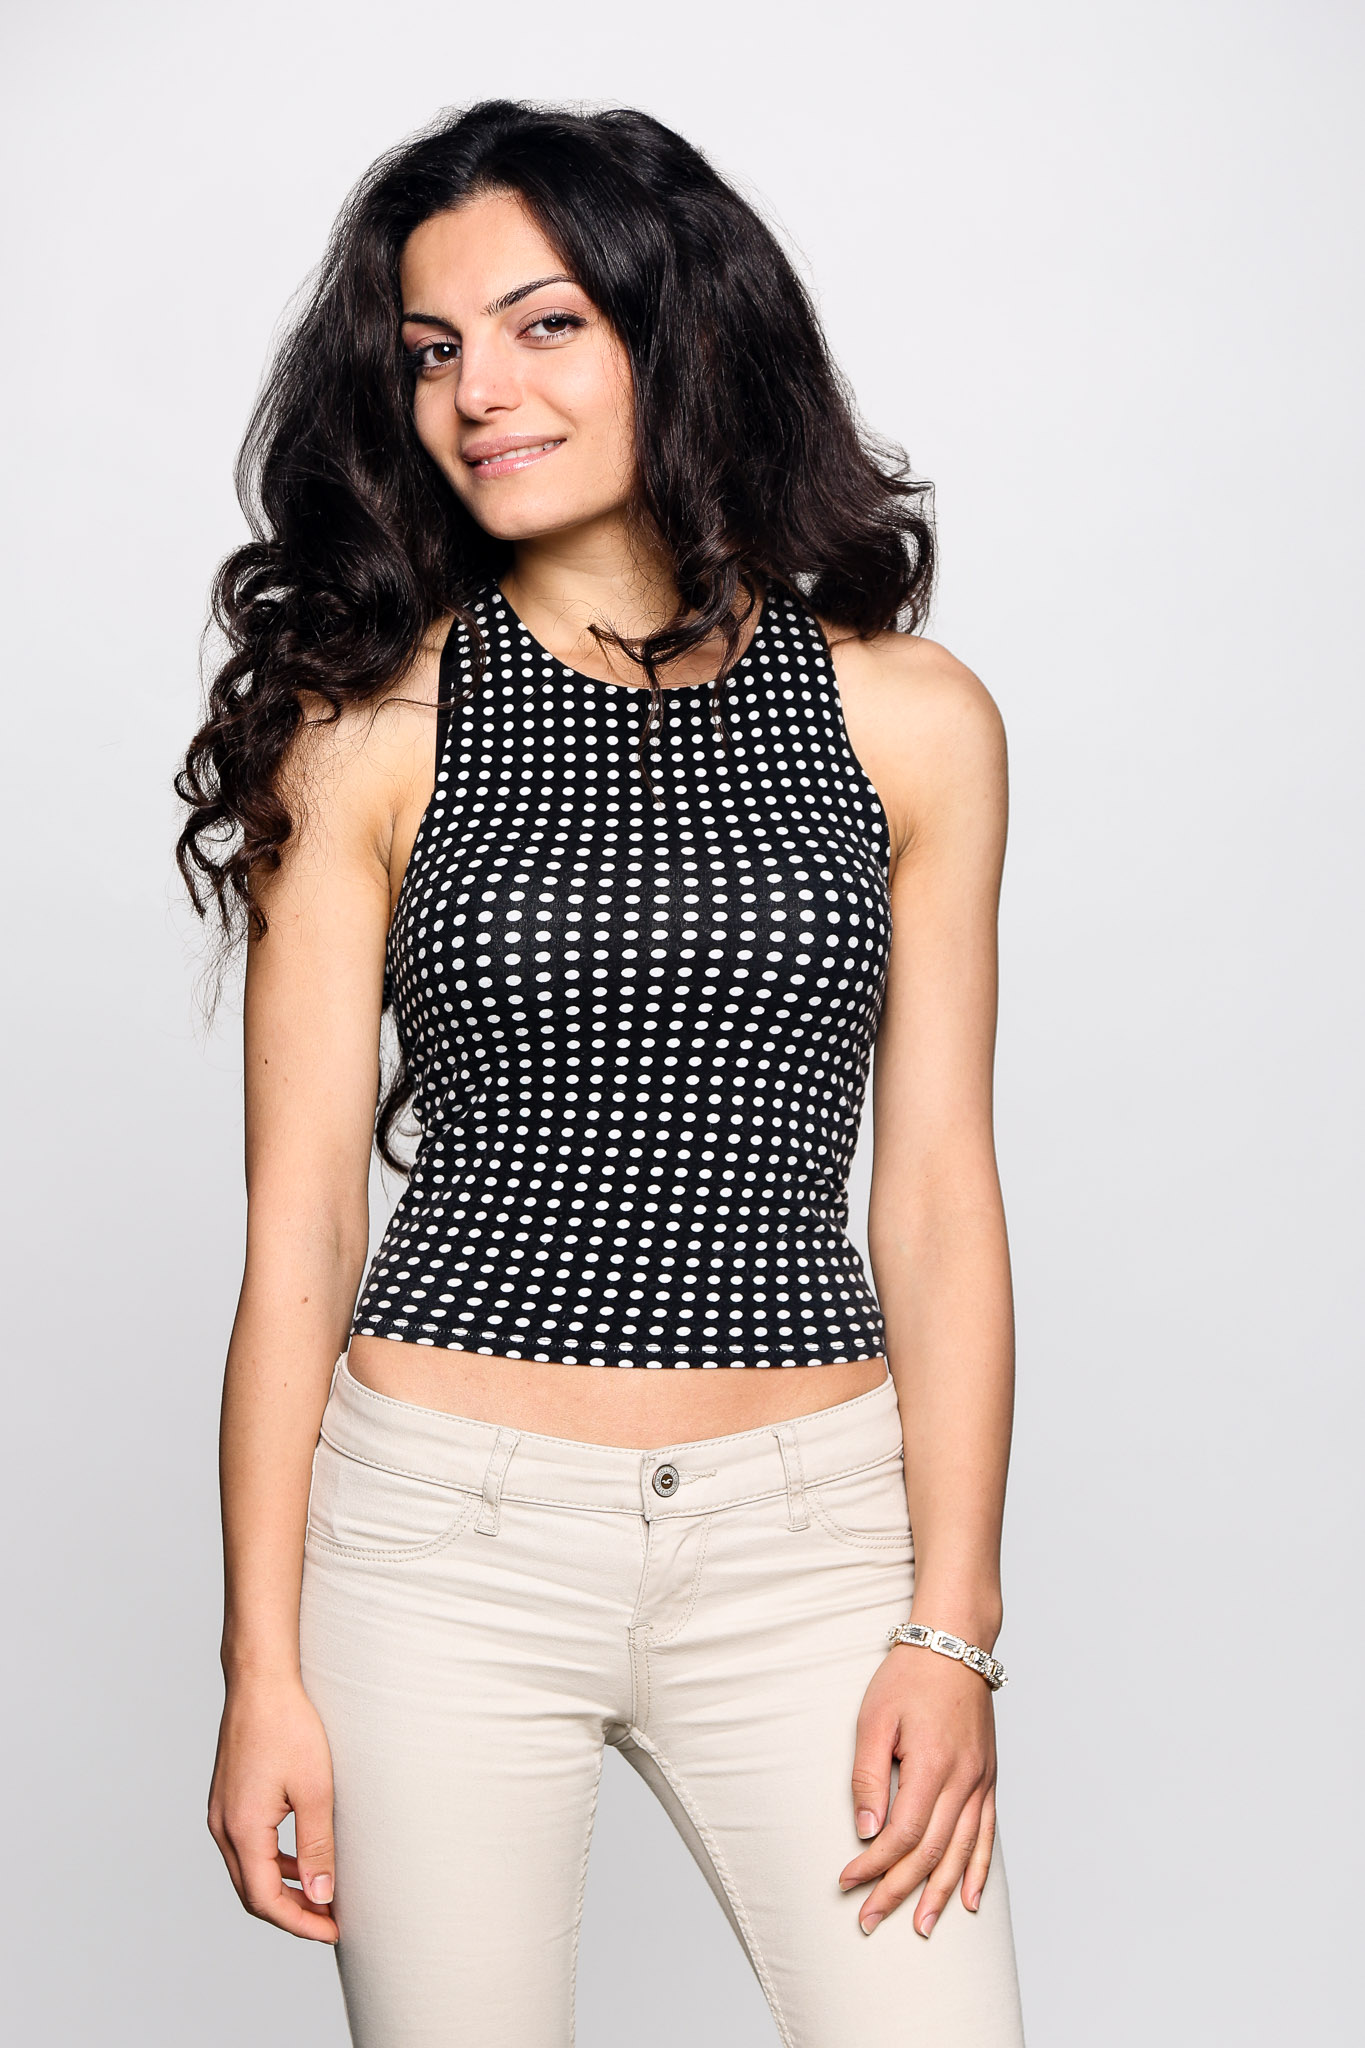
I love a super simple one light fashion lighting setup. In 2015, clients want everything fast. With this easy setup, I can deliver great results with a minimal amount of fuss.
Backstory
On the weekends, I supervise the film lab and lighting studio at Glendale Community College. When things get slow, I like to test new lighting setups. Fortunately, I have a great assistant named Arpine who loves to have her picture taken. She may look like a model, but she’s actually a very serious student who is going to UC Berkeley in the fall.

Fashion Lighting Setup
I wanted a big light so I went with the 7 foot Photoflex Octodome. This is an amazing modifier, but it’s a pain to setup. If you want a divorce from your wife, try setting this up together.
I rolled down a white seamless background and placed the light directly behind me. I then moved the light up to the point where there was a little shadow under the model’s chin but the eyes still had some catchlight in them.
The nice thing about a big light at this distance is that it provides even coverage over the clothes so you don’t have to worry about the inverse square law. The bad thing is that it can be FLAT since a light this big from the front really doesn’t provide very much shape and direction.
To compensate, I moved in a couple of black v-flats close to the subject to place a black shadow along the sides of the body. Even with this trick, I still had to increase my contrast in the final images.

Camera Position and Settings
I used manual mode and set the shutter to 1/125 sec ( this is my default shutter speed in the studio.) I set the aperture to f5.6 so I could get Arpine in focus but still blur out the seamless background that had some wrinkles. The ISO was set to 100 since I wanted maximum quality.
I shot from a low position and at a long focal length of 70mm-105mm. This compressed the face and stretched the body. This isn’t the best position for portraits, but for a thin fashion model, it totally works.

Parting Words
The images above are simple jpegs straight out of the camera. A little contrast was added in post, but that’s it.
I setup and shot this in less than 30 minutes with a lab full of students. It’s never easy to work with an audience, but with this setup, you can “set it and forget it.”
Camera: 5D mkii with a 24-105mm lens.



Nice and Perfect looking outfit..
David, I am an entry level photographer also a learner. You know, nobody can say s/he is an expert in this profession, I think so. Though I know something about photography, after reading this post, I know something new about lighting. You know, Lighting is kinda hard as always. But you express the whole thing in an easy way. Thanks a bunch for sharing.
Hi David,
Amazing staff. Nice looking kits and the setup was really good.
Are you trying to find the perfect outfit? Check out our newest chic collection ideal for folks who enjoy classic styles but also seek edgier looks so try the new trendy Tyler Durden jacket
very good blog, thank you
**”Sounds like quite the setup process, but the results must be worth it! The black v-flats trick is genius for adding depth to the shot. Great tips on handling big lighting like this!”**
Thanks for your Great article. I Have read this article and I love this post. please try to share more post like this .
Thanks
The Timeless Appeal of the Black T-Shirt: A Wardrobe Essential for Everyone
When it comes to fashion staples that have stood the test of time, the black T-shirt ranks at the top of the list. Simple, sleek, and effortlessly cool, the black T-shirt is a must-have in every wardrobe. Whether you’re dressing up for a night out or keeping it casual for a day in, a black T-shirt never fails to deliver style, comfort, and versatility.
Mastering an easy fashion lighting setup transformed my shoots. I rely on a key light with a softbox at a 45-degree angle and a reflector to ecommerce photo editing services fill shadows—it’s quick, effective, and flattering. This setup brings out textures and details while keeping the mood stylish and professional without overcomplication.
Very informative for Fashion
lovers
Love this fashion lighting setup! ???? The one-light Octodome + v-flats tip is so simple yet effective. Thanks for sharing! ????
This lighting setup is fantastic for anyone looking to capture clean, professional Fashionimages without a complicated studio arrangement! I love how you explained the use of a single large light and black v-flats to add dimension—so practical for fast-paced shoots. Definitely bookmarking this for my next shoot! ????✨
Jack recently posted…Your Ultimate Fall Capsule Wardrobe 2025: What to Wear This Season
Really cool setup! I love how simple yet effective this one-light technique is. The tips about using v-flats for contrast were super helpful — great results with minimal gear! ????????